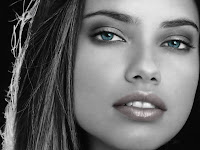
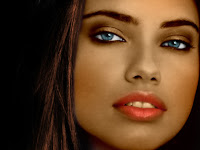
explain step by step how to color a picture that is in grayscale to stay in a very realistic
I have used a photo of a woman's face but the same way as explain here what you can do with other images:
1. Open the photo you wish to color and create a new layer which we colored with pink everything that is part of the face (with the opacity and flow at 100%), no matter what color the eyes or other parts of the face such as hair or lips, because after we will correct.
2. For the color this mix, so to speak, with the image we put this layer in which we have colored the whole area of \u200b\u200bthe face in Multiply blending mode. So we will have the area of \u200b\u200bthe face with a similar color to the skin.
3. Now we can start deleting all the draft is not part of the face is the hair and eyes (we leave the lips with color)
4. Create another layer for the lips. With the brush with the color we want to put to his lips colors as we did with the face (100% opacity and flow) but this time we do not change the mode of fusion, but we apply the blur filter Filter> Blur> Gaussian Blur and give values \u200b\u200bthat will best fit our imagen.Esto makes color expand by much of the face so that the draft does not remove everything that matches your lips.
5. The eyes can be colored in different ways but the best is to select the iris of the eye in the background layer and press (Ctrl + U) and gained access to a window to change the tone of the selected area. Check the box to put color and once this is done through the bars of light, tone, etc, select the color you like best for the eyes. Also to clarify the rest of the eye to make it whiter can do with the tool to overexpose giving the eye area that we want to clarify, but all in the background layer and bearing in mind that we should have cleared the area of \u200b\u200bthe eyes in layer color the face.
6.For hair, hair coloring can use the same procedure as for the eyes, select the background layer and press Ctrl + U and look for the color you want by checking the colorear.Nota: Be careful to remove care areas we do not want to color and also select either the area of \u200b\u200bthe eyes and hair to achieve an effect as realistic as possible
7. Thus we have the colors applied to the picture but to improve it and put details can apply shadows with the Burn tool and countless more things, I for example in my image I've done has been: In the face layer I darkened areas such as the lipstick and eyelashes and eyebrows, also some areas of hair. A completed
see details flatten the layers of the image Layer> Flatten Image.
And finally give it a nicer touch the following manner: Duplicate the image and attached and put it in the new Lighten blending mode and apply a Blur Filter> Blur> Gaussian (blur with very low values) and so give a blur effect to the image that is doing very well.
Hope this helps. Greetings!
RESULT:


0 comments:
Post a Comment